System monitoring controller
Contents
The service provides tools to monitor system parameters of local and remote machines.
Collected data can be used later for custom alerts, dashboards, analytics etc.
Monitoring
After setup, the service creates sensors for various system parameters. Reports are sent by provider modules, which can be flexibly configured in the service configuration.
Note
If a system metric contains symbols, disallowed in EVA ICS v4 OIDs, these symbols are replaced with triple underscores (“___”).
System
The system provider creates sensors in a sub-group “os”, which display OS version, kernel version, CPU architecture etc. as well as system uptime.
CPU
The cpu provider creates a sub-group “cpu” and displays CPU usage and frequency for every CPU core in the system. The list of CPUs is auto-generated.
Load average
The load average provider creates a sub-group “load_avg” and displays system load averages for 1, 5 and 15 seconds (UNIX/Linux standard).
Memory
The memory provider creates sub-groups “ram” and “swap” and displays memory and swap information.
Disks
The disk provider creates a sub-group “disk” and displays information about mount points.
The list of mount points is detected automatically. When a mount point is removed, the monitoring is stopped. This behaviour can be changed if the list is specified in the service configuration:
only specific mount points are monitored
if there is no mount point found, its sensors’ status becomes -1 (ERROR)
Mount point sensors are specified without leading slashes. For system root in Linux/UNIX systems, sensors are created in a sub-group called “SYSTEM_ROOT”.
Block devices
The block devices provider creates a sub-group “blk” and displays information about block devices (physical disk drives).
The list of block devices is detected automatically (loop devices are ignored). When a block device is removed, the monitoring is stopped. This behaviour can be changed if the list is specified in the service configuration:
only specific devices are monitored
if there is no device found, its sensors’ status becomes -1 (ERROR)
Explanation for certain sensors:
r read operations a second
rb read bytes a second
w write operations a second
wb written bytes a second
util % of block device utilization (100 = completely busy)
Note
The block devices provider works on Linux systems only.
Network
The network provider creates a sub-group “network” and displays information about network interfaces.
The list of interfaces is detected automatically. When an interface is removed, the monitoring is stopped. This behaviour can be changed if the list is specified in the service configuration:
only specific interfaces are monitored
if there is no interface found, its sensors’ status becomes -1 (ERROR)
Explanation for certain sensors:
rx received (incoming) packets during the last second
rx_total total number of received packets
rx_err received packet errors during the last second
rx_err_total total number of received packet errors
rxb received bytes during the last second
rxb_total total number of received bytes
The same abbreviations apply for transmitted (outgoing) packets. These sensors start with tx_ prefix.
Setup
Use the template EVA_DIR/share/svc-tpl/svc-tpl-controller-system.yml:
# System controller service
command: svc/eva-controller-system
bus:
  path: var/bus.ipc
config:
  # accept remote agents
  #api:
    # client OID prefix. may contain ${host} variable
    # if no host variable exist, the host name is automatically added at the end
    #client_oid_prefix: sensor:${system_name}/system/host
    #listen: 0.0.0.0:7555
    #max_clients: 128
    # if a front-end server or TLS terminator is used
    #real_ip_header: X-Real-IP
    # in case if set, a remote host can be verified by an external
    # authenticator (e.g. on a front-end server). if specified, the service
    # MUST be run under a trusted front-end and no direct requests should be
    # allowed. Also accepts host names as "CN = host" (RFC 2253)
    #trusted_system_header: X-Authenticated-System
    # host map (name/key)
    # note: the service has got an own key database
    # the keys are not related with EVA ICS API keys
    #hosts:
      #- name: host1
        #key: "secret"
  report:
    oid_prefix: sensor:${system_name}/system
    # when started on a secondary point
    #oid_prefix: sensor:${system_name}/system/host/SPOINT_NAME
    # system info and uptime
    system:
      enabled: true
    # cpu info
    cpu:
      enabled: true
    # system load average
    load_avg:
      enabled: true
    # memory info
    memory:
      enabled: true
    # disk info
    disks:
      enabled: true
      # enable specific mount points only
      # note: for automatic mountpoint list reporting unavailable is not supported
      #mount_points:
        #- /
        #- /var
    # block device info (Linux only)
    blk:
      enabled: true
      # enable specific devices only
      # note: for automatic device list reporting unavailable is not supported,
      # loop devices in auto-list are omitted
      #devices:
        #- nvme0n1
        #- nvme1n1
        #- sda
        #- sdb
    # network info
    network:
      enabled: true
      # enable specific interfaces only
      # note: for automatic interface list reporting unavailable is not supported
      #interfaces:
        #- eth0
        #- eth1
    # custom tasks with external executables
    # the executable must return either a value or JSON payload
    exe:
      tasks:
        - command: "echo OK"
          name: test
          enabled: true
          interval: 1
          # put the result as-is
          map:
            - name: result
        - command: "sensors -j"
          name: sensors
          enabled: true
          interval: 1
          # parsing JSON values is performed with a lightweight JsonPath syntax:
          # $.some.value - value is in a structure "some", field "value"
          # $.some[1].value[2] - work with array of structures
          # $.[1] - top-level array of values
          # $. - payload top-level (the path can be omitted)
          map:
            - name: fan1
              path: $.bus.fan1.fan1_input
              # an optional value transforming section
              transform:
                - func: multiply # multiply the value by N
                  params: [ 1000 ]
                - func: divide # divide the value by N
                  params: [ 1000 ]
                - func: round # round the value to N digits after comma
                  params: [ 2 ]
                - func: calc_speed # use the value as calc-speed gauge (with N seconds delta)
                  params: [ 1 ]
                - func: invert # invert the value between 0/1
                 #params: []
            - name: fan2
              path: $.bus.fan2.fan2_input
user: eva
Create the service using eva-shell:
eva svc create eva.controller.system /opt/eva4/share/svc-tpl/svc-tpl-controller-system.yml
or using the bus CLI client:
cd /opt/eva4
cat DEPLOY.yml | ./bin/yml2mp | \
    ./sbin/bus ./var/bus.ipc rpc call eva.core svc.deploy -
(see eva.core::svc.deploy for more info)
Monitoring remote hosts
The service monitors only the host on which it is running.
Monitoring secondary points
To monitor a secondary point, it must run an own service.
Monitoring non-EVA ICS hosts
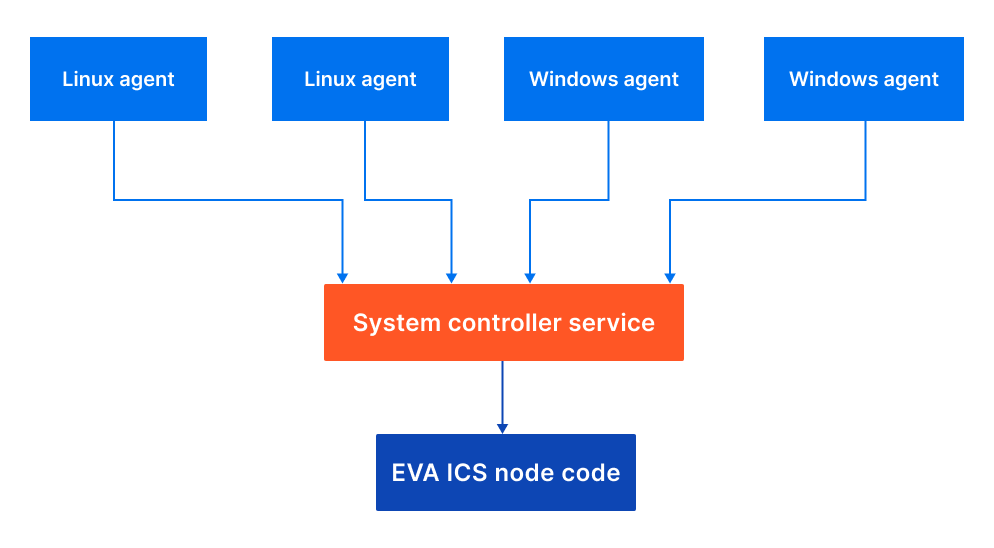
Non-EVA ICS hosts can send system telemetry data using either pre-built agents or HTTP API.
Enable api section in the service configuration and configure the list of allowed hosts and their API keys.
For wide-area networks it is recommended to use a front-end server to secure API port with SSL/TLS and apply additional limits on incoming connections.
Commons
Agents can be downloaded at https://pub.bma.ai/eva-cs-agent/
Note
Agent binaries have got own release cycles and are not updated with every EVA ICS stable build.
For all systems agent configuration is the same and is similar to the service configuration:
client:
  server_url: http://server-host:7555/
  # enable FIPS-140 mode on Linux, check FIPS-140-compatible binary on Windows
  fips: false
  auth:
    # name-key authentication
    name: test
    key: xxx
    # X509 authentication on Linux (PEM)
    #cert_file: /path/to/cert.pem
    #key_file: /path/to/key.pem
    # X509 authentication on Windows (Local machine certificate store)
    #store: Trust # Trust for `Enterprise Trust` store, My for `Personal` store
    #cert: hostname # certificate common name
report:
  system:
    enabled: true
  # cpu info
  cpu:
    enabled: true
  # system load average
  load_avg:
    enabled: true
  # memory info
  memory:
    enabled: true
  # disk info
  disks:
    enabled: true
    # enable specific mount points only
    # note: for automatic mountpoint list reporting unavailable is not supported
    #mount_points:
      #- /
      #- /var
  # block device info (Linux only)
  #blk:
    #enabled: true
    # enable specific devices only
    # note: for automatic device list reporting unavailable is not supported,
    # loop devices in auto-list are omitted
    #devices:
      #- nvme0n1
      #- nvme1n1
      #- sda
      #- sdb
  # network info
  network:
    enabled: true
    # enable specific interfaces only
    # note: for automatic interface list reporting unavailable is not supported
    #interfaces:
      #- eth0
      #- eth1
Linux agents
The configuration file must be placed as /etc/eva-cs-agent/config.yml
It is highly recommended to run the agent under a restricted user
The configuration should be secured and allowed to access by the agent user only
The agent binary can be started manually, e.g. for tests. In this case it outputs logs to the system console. When piped/started with systemd or other system launcher, the agent outputs its logs to syslog
For Debian/Ubuntu systems pre-built .deb packages can be used. The packages automatically create eva-cs-agent user in the system.
For other systems the following systemd service template can be used: https://github.com/eva-ics/eva4/blob/stable/svc/controller-system/eva-cs-agent.service
Warning
The provided Linux agent binaries are not FIPS-140 compliant and should not be used with HTTPS URLs if FIPS-140 is mandatory. FIPS-140 compliant binaries can be provided for Enterprise customers by request.
Microsoft Windows agents
The agent executable can be placed to any folder (e.g. C:\ProgramData\eva-cs-agent)
The configuration file must be placed in the same folder as the agent binary and called config.yml
The configuration should be secured and allowed to access by system administrators/system services only
The agent binary can be started manually, e.g. for tests with “run” argument. In this case it outputs logs to the system console. When started as a Windows service, the agent outputs its logs to the Windows event log (section Application).
To register the windows agent as a service and start it, use the following commands:
.\eva-cs-agent.exe register
Start-Service EvaCSAgent
or using a custom name:
SC.exe create EVA.cs.Agent binPath=path\to\eva-cs-agent.exe
To unregister the service, use the following command:
Stop-Service EvaCSAgent
.\eva-cs-agent.exe unregister
The last command stops the service by itself however it is recommended to stop it manually before to ensure the instance is stopped.
Note
The provided Windows agent binaries use standard Windows cryptographic modules only. To enable FIPS-140 compliance, enable it system-wide, by setting “Use FIPS compliant algorithms for encryption, hashing, and signing” in the system security policy.
Using HTTP API
Metrics can be sent by custom agents using the service HTTP API:
HTTP header X-System-Name must contain the host name
HTTP header X-Auth-Key must contain the host API key
Requests must be submitted with POST to URL
http://HOST:7555/report
with the following payload:
[
 {
     "i": "some/metric",
     "status": 1,
     "value": 123
 },
 {
     "i": "some/metric",
     "status": 1,
     "value": 777
 }
]
All fields are mandatory, for status and value, short forms “s” and “v” can be used. Values may contain any data, status should be set to “1” if the measured resource is working properly or to “-1” or other negative (the status register is 16-bit signed integer) values for errors.
X509 authentication
Remote systems agents can be authenticated using X509 client certificates. To enable X509 authentication, follow these steps:
Front-end configuration
During X509-authentication the service uses X-Authenticated-System HTTP header to accept the system name. The header is set by the front-end server. As the header is fully trusted and no further check are performed, make sure the service instance API port is not exposed, except to the front-end server.
NGINX configuration example:
server {
  listen 443 ssl;
  server_name somehost;
  ssl_certificate /etc/ssl/private/server.crt;
  ssl_certificate_key /etc/ssl/private/server.key;

  # Specify CA which signs client certificates
  ssl_client_certificate  /etc/ssl/private/myca.crt;
  # Request client certificates
  ssl_verify_client on;

  ssl_session_timeout 1m;

  location /report {
    proxy_pass http://eva-node-host-or-ip:7555;
    # for logging purposes
    proxy_set_header X-Real-IP $remote_addr;
    # pass client certificate DN to the service
    proxy_set_header X-Authenticated-System $ssl_client_s_dn;
  }
}
Service configuration
Set real_ip_header and trusted_system_header in the service configuration, section api:
api:
  # ..............
  real_ip_header: X-Real-IP
  trusted_system_header: X-Authenticated-System
Linux agent configuration
Instead of specifying name and key fields in clint/auth, specify cert_file and key_file:
client:
  # ..............
  auth:
    cert_file: /path/to/client.crt
    key_file: /path/to/client.key
The certificate file contains either the client certificate or the full certificate chain (PEM foramt).
The key file contains the client private key (PKCS#8 only, PEM).
Windows agent configuration
Specify store and cert fields in client/auth:
client:
  # ..............
  auth:
    store: Trust
    cert: systemname
Where store is the certificate store name (valid values are My for Personal store, Trust for Enterprise Trust store) and cert is the certificate subject name (CN).
In case if the certificate subject contains additional fields, it is required to specify
# ....
cert: "FULL SUBJECT"
The certificate resolver can also find the required certificated by its sha1 (Thumbprint):
# ....
cert: id=aaf4c61ddcc5e8a2dabede0f3b482cd9aea9434d
The certificate together with the private key must be installed in the system store (“Computer certificates”).
Note
Starting from the build #10, FIPS-140 windows agents use AWS Libcrypto for certain cryptographic operations. The library is FIPS-140-3 compliant.