Two-factor OTP authentication
For additional security, it is possible to turn on two-factor one-time-password authentication for the specified or all users in the setup.
Note
Two-factor authentication is not supported by the default mobile client evaHI. Consider creating dedicated mobile user accounts.
Contents
System setup
Services
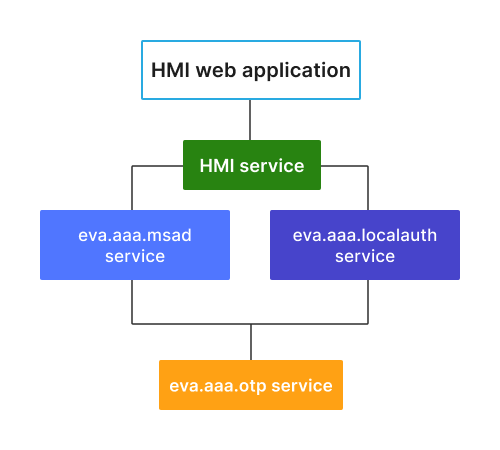
Two-factor authentication is provided by OTP 2nd-Factor authentication service and supported by:
To start using OTP, the above services require otp_svc configuration parameter set to the deployed OTP service ID. Note that if the default domain is configured in Active directory auth service, user and user@domain are processed as two different users.
Excluding user accounts from OTP
Certain user accounts can be excluded from 2FA with:
exclude field of OTP 2nd-Factor authentication service configuration
by deploying additional authentication services, without otp_svc configured.
Resetting OTP for a user account
If a user has lost his OTP secret, the following service RPC call can be used to reset it. E.g. let us use eva-shell:
eva svc call eva.aaa.otp otp.destroy i=USER
User authentication
API
Use generic authentication functions to authenticate users. No special RPC/HTTP calls are required.
If a user is correctly authenticated with the password, but there is no OTP code provided, the authentication service returns an error with code -32022 (ACCESS_DENIED_MORE_DATA_REQUIRED) and the following message:
|OTP|<SVC_ID>|PAYLOAD
where <SVC_ID> is the OTP service ID and the payload is:
REQ OTP code is required (not provided)
INVALID OTP code is provided but invalid
SETUP=<SECRET> OTP setup is required, use the secret provided
To finish authentication, repeat the login process again, with an extra parameter in the payload:
{
  // HTTP API or EAPI payload
  "xopts": { "otp": "CODE" }
}
Authenticator programs
OTP 2nd-Factor authentication service provides the default HMAC-based Time-OTP with SHA-1 checksums and 6-digit code length.
Such TOTP is fully supported by the following programs out-of-the-box:
and other compatible.
HMI application example
OTP is supported out-of-the-box by EVA ICS WebEngine.
Here is a Vanilla JS (TypeScript) example of two-factor login logic in HMI web application.
The example requires qrious module installed:
npm install --save https://www.npmjs.com/package/qrious
import "./style.css";

import { Eva, EventKind, disableTabFreeze } from "@eva-ics/webengine";
import QRious from "qrious";

interface Config {
  api_uri?: string;
  debug?: boolean;
}

disableTabFreeze();

const eva = new Eva();

eva.external.QRious = QRious;

eva.on(EventKind.LoginSuccess, () => {
  // hide QR container in case if OTP setup process was going
  hide("qr_container");
  set_status(`Logged in as ${eva.server_info.aci.u}`);
  // do not forget to clear the password in DOM and framework variables
  clear("password");
  eva.login_xopts = null;
});
eva.on(EventKind.LoginFailed, (err) => {
  set_status(`Login failed: ${err.message} ${err.code}`);
  show("login_form");
  clear("password");
  focus("password");
});
eva.on(EventKind.LoginOTPRequired, () => {
  show("otp_form");
  set_status("OTP code required");
  focus("otp_code");
});
eva.on(EventKind.LoginOTPInvalid, () => {
  show("otp_form");
  set_status("Invalid OTP code entered");
  clear("otp_code");
  focus("otp_code");
});
eva.on(EventKind.LoginOTPSetup, (msg) => {
  show("qr_container");
  show("otp_form");
  set_status("Scan this code with an authenticator app");
  eva.otpQR("qr", msg.value);
  focus("otp_code");
});

// if config.json is used
eva.load_config().then(() => show_hmi());

const show_hmi = () => {
  document.querySelector<HTMLDivElement>("#app")!.innerHTML = `
  <div id="status"></div>
  <div id="qr_container" style="width: 200px; height: 200px; display: none">
    <canvas id="qr"></canvas>
  </div>
  <div id="login_form">
    <form id="f_login_form">
    User: <input type="text" id="login"><br>
    Password: <input type="password" id="password"><br>
    <input type="submit" value="Login">
    </form>
  </div>
  <div id="otp_form" style="display: none">
    <form id="f_otp_form">
    OTP: <input type="text" id="otp_code"><br>
    <input type="submit" value="Continue">
    </form>
  </div>
  `;
  document.getElementById("f_login_form")!.onsubmit = process_login;
  document.getElementById("f_otp_form")!.onsubmit = process_otp;
  focus("login");
};

const hide = (id: string) => {
  document.getElementById(id)!.style.display = "none";
};
const show = (id: string) => {
  document.getElementById(id)!.style.display = "block";
};
const focus = (id: string) => {
  document.getElementById(id)!.focus();
};
const clear = (id: string) => {
  (document.getElementById(id) as HTMLInputElement).value = "";
};
const set_status = (msg: string) => {
  document.getElementById("status")!.innerHTML = msg;
};
const process_login = (e: SubmitEvent) => {
  e.preventDefault();
  set_status("Logging in...");
  const login = (document.getElementById("login") as HTMLInputElement).value;
  const password = (
    document.getElementById("password") as HTMLInputElement
  ).value;
  eva.set_login_password(login, password);
  hide("login_form");
  eva.start();
};
const process_otp = (e: SubmitEvent) => {
  e.preventDefault();
  set_status("Logging in...");
  eva.login_xopts = {
    otp: (document.getElementById("otp_code") as HTMLInputElement).value
  };
  hide("otp_form");
  eva.start();
};
See also: Creating a web-HMI application.